


Launching the GoCardless Configuration
Once the app is installed, it will need to be setup before you can start taking payments.
To begin; open the GoCardless App from the AppLauncher.
Clicking the GoCardless Configuration should bring up the configuration wizard.
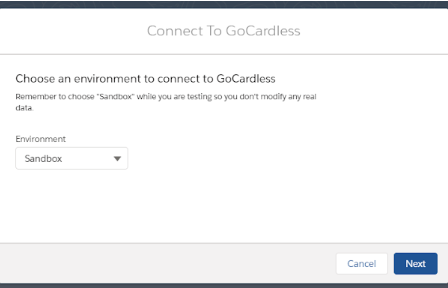
Initially, you will be asked to select whether the current Org should use Sandbox or Production. Only select Production if this environment is going to be used for live payments with real customer data, otherwise select Sandbox. Please note that this selection is not able to be changed in the future.
GoCardless Account
You will then have to sign into your GoCardless account. Please note that you will need to be on either the GoCardless Plus or Pro plans in order to use the GoCardless for Salesforce Billing app. Follow the on screen instructions to login.
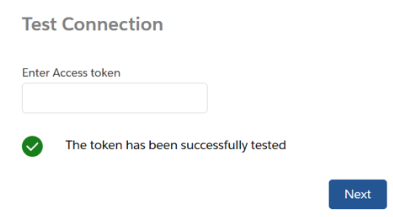
Test Connection
To setup the connection between your Salesforce Org and your GoCardless account, you will need to configure your access token. You can create a token from your GoCardless sandbox account or GoCardless live (production) account.
Once the token is created, paste it into the Access Token field in Salesforce, and test the connection. If successful, you will be able to proceed with configuration.
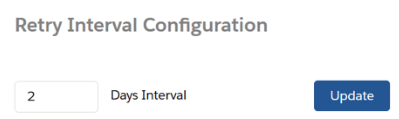
Payment retry settings
When a payment fails in GoCardless for Salesforce Billing, it will automatically be retried after a set number of days have passed. The retry interval may be set to zero days if you would like the payment to be submitted for retrying on the same day that it failed. If a payment fails three times, it will no longer be able to be retried through GoCardless.
Salesforce Configuration
In order for the GoCardless for Salesforce Billing app to function correctly, a number of configurations need to be made within Salesforce. Please follow the steps in our Salesforce Configuration article next.