|
We now have dedicated Setup Guides to help you set up and verify your account! |
Once you click on the Add details now -> link in the yellow banner at the top of your dashboard, or click the link to verify your account via the welcome email you received upon signing up, you'll be directed to the verification flow to Verify your account.
The steps in this process are as follows:
- Select a package
- Tell us about your company
- Contact details
- Add your brand
- Connect your bank account
- Verify payout account
- Verification status
You will first be presented with the following page:
... Click Continue -> to get started.
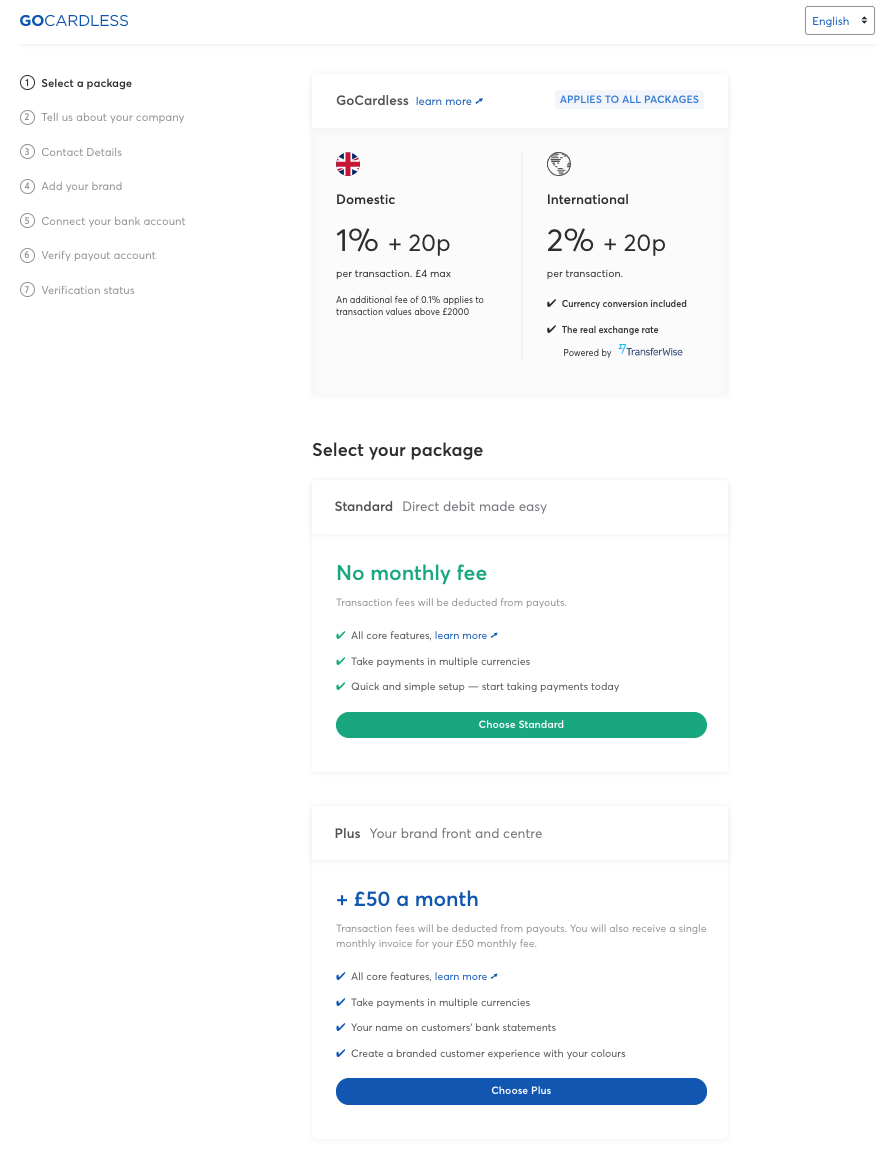
1. Select a package

This package will apply to the default Direct Debit scheme on your account, which is applied upon sign up based on your locality.
You can find more information on our packages via the link to Learn more about our pricing at the bottom.
2. Tell us about your company
First select the country your business/organisation is based...
You will then be asked to select your Business type.
You can find a list of business types we can serve in each country here.
If you're unsure of your business type, please see here for more information.
The business type you select will determine the next pieces of information we require.
See here for a walkthrough on entering the details required for each business type (Step 2)
3. Contact details
First is your Support contact details. These are the details that your customers will see on their notification emails sent from GoCardless.
Next is your Billing contact details. This is where your payout notification emails will be sent, along with your invoices if you've chosen the Plus or Pro package.
Lastly, you can also enter your Developer contact details if applicable. This is where we'll send any information about your integration (if you've selected to build your own integration with our API) or our API.
When you're ready, click Continue to move onto the next step.
4. Add your brand
You're able to customise the payment pages and notification emails your customers receive from GoCardless.
To begin, upload your business logo.
Click the Upload a logo box to choose the logo file from your computer/device.
Once uploaded, you will see the logo replace your business name at the top of the example form.
You can also use the toggle at the top to see how your logo will appear on notification emails.
Next, choose how you would like your name to appear on your customers' bank statements.
Simply type your chosen reference into the Reference field provided.
NOTE: This only applies if you've selected our Standard package, where this reference will be included as part of the full reference provided on your customers' bank statements.
If you've selected the Plus or Pro package, your business name only will appear on your customers' bank statements as it will be registered against your unique scheme identifier.
See here for more information on customer bank statement references.
If you've decided that you would prefer to add further customisation options to your customer experience, you have the option to Upgrade to Plus.
When you're ready, click Continue to move onto step 5.
5. Connect your bank account
This is the bank account we'll payout any funds we collect on your behalf to, for the scheme currently applied to your account.
IMPORTANT: The bank account you enter must be registered in the same name as the legal entity you are collecting payments on behalf of; e.g. if your company is registered in the name "Example Company", your bank account must also be registered with the account holder name of "Example Company".
Once you click Submit bank details, you will be shown confirmation of the bank account you added.
Click Continue to move on to the next step.
6. Verify your payout account
Until your payout bank account has been verified, we'll be unable to payout any collected funds to you.
Click Verify your bank account to view details of where to make the verification payment.
(You will also receive an email with these details once you've submitted your bank details in the previous step in case you're unable to complete the verification payment immediately).
To verify your bank account, you will need to make a 1p payment transfer from your payout bank account to our verification account, via your online banking.
Please enter the reference correctly, otherwise it may delay the verification of your account.
Once you have made the payment, confirm by clicking I have sent this deposit and Continue to the final step.
7. Verification status
In some cases we may not be able to verify your details automatically. When this happens, we'll need to ask for evidence of your details.
Click on each blue 'requested information' box in turn to find out what we require from you.
Example:
Once you upload your document(s), these will be reviewed by one of our verification team.
If there are any problems, we'll be in touch via email to let you know what's needed.
In the meantime, you're welcome to begin using your account!